If you are looking for functionality similar to notepad++ functionality of replacing a string in all the files in a certain folder, Look no more, in linux this is a simple command
Assuming you are on the command line and the directory containing the files is the active one (cd)
the following line will replace foo with bar in all files on the current root directory but not in subdirectories
sed -i -- 's/foo/bar/g' *
If you want it to go recursively into sub directories, you can combine the above with the find command
find . -type f -exec sed -i 's/foo/bar/g' {} +
if you want sed to backup the files before it does the replace, use the following command, you can replace the .bak with anything you like
Many modern SD cards support the trim command () in Linux, the problem is that not many SD card readers (Mostly USB) do
So running () on a mounted card will usually return an error such as
fstrim -v /hds/usb
fstrim: /hds/usb: the discard operation is not supported
The command “lsblk –discard /dev/sdf” should tell you whether your SD card/adapter combination support trim right now, so the failure of the fstrim command above can be predicted in advance with this command
Now, assuming your SD card is not mounted, and you need to format it, Will formatting restore the speed ? unfortunately not, to restore the speed, before formatting your SD card, you might want to run the blkdiscard function, mind you, this command will delete all your data !
blkdiscard -f /dev/sdf
but even that might not work
blkdiscard: Operation forced, data will be lost! blkdiscard: /dev/sdf: BLKDISCARD ioctl failed: Operation not supported
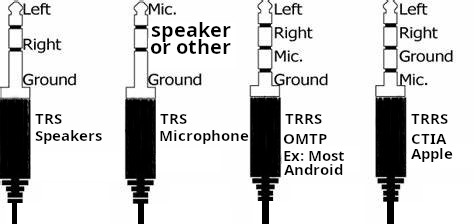
CTIA, which you can think of as apple, and i will call it apple throughout the post to help you focus on what matters, and OMTP, Which is everything else which i will call Android from here on.
For android (And almost any non apple device), the sleeve (Pin closest to the wire) is the ground, and the ring right above it would be the microphone… the other ring and the tip are the two speakers, right and left, In apple’s setup, the ground and microphone are switched together !
TRS
In a 3 pin connector (TRS), When it is meant to carry microphone signal, the tip is the microphone signal, the sleeve is still the ground, and the ring may carry any other signal such as a single speaker channel.
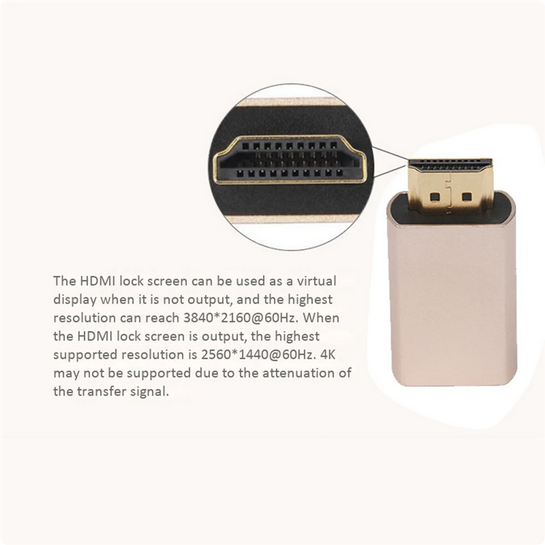
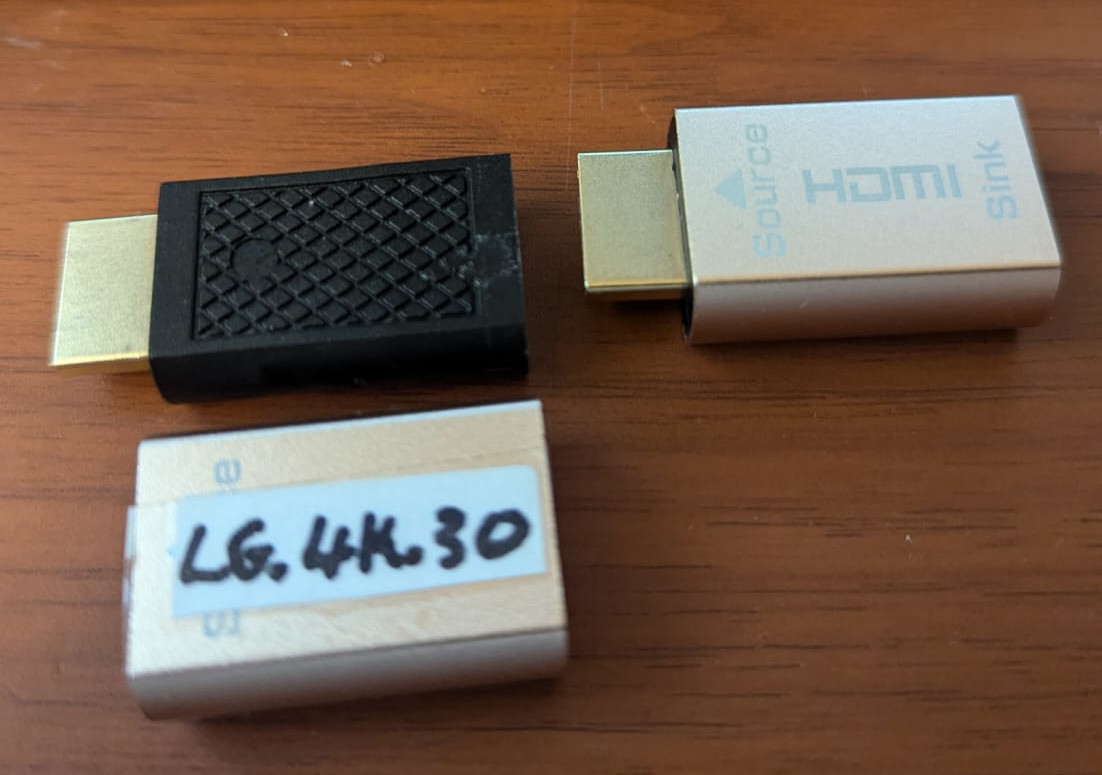
A nice adapter that has both input and output is this which i got from AliExpress (Photos at the bottom)
This 4K dummy adapter seems to support all resolutions up to 60Hz refresh rate, with the exception of 4K which works at a maximum of 30Hz (Probably due to signal attenuation)
There are many uses for this dummy adapter, one of them is “Sunshine and moonlight remote desktop”, another is using your GPU for processing while you are away (Nvidia won’t allow it if you don’t have a monitor connected and switched on), and most importantly TO ME, My video switch since I use multiple machines on the same monitor.
What this adapter is in reality is an eeprom chip that has the EDID data of a monitor with a very high refresh rate (120 hz), namely a fictitious monitor named AOC 28E850, If you want to make sure that this works with your monitor, it needs to be flashed with your monitor’s EDID.
If your monitor supports 4K at 60hz, you need to keep everything in that copy, and remove the 4K.60Hz from the list
If you want the modified file that originated from my LG 27UL550 and was modified to remove the 60Hz from the list of supported configurations, meaning I removed the 60 FPS from the 4K DTD, then here it is, just download it and flash it (Flashing instructions below) I also changed the monitor’s name just in case some systems might cache it’s details…
The steps
1- Find out the port on your graphics card that your monitor is connected to
2- Copy the EDID data from your monitor
3- Edit the data to remove the 4K/60 fps 4- Burn the data onto the adapter
To do that, there are many tools, one thing to note is that edid-rw did not work using my laptop which has a 9400mx, but worked just fine using an old PC i have with a “GT218 [GeForce 210]”, the error on the laptop reads
sudo ./edid-rw 5
Traceback (most recent call last):
File “./edid-rw”, line 131, in
main()
File “./edid-rw”, line 119, in main
edid = [dev.read(i) for i in range(EDID_HDR)]
File “./edid-rw”, line 46, in read
return self.smb.read_byte_data(EDID_ADDR, n)
IOError: [Errno 110] Connection timed out
Now, you have python, let us download the tool, you can do that with the download button on github, I would rather just
git clone https://github.com/bulletmark/edid-rw
cd edid-rw
To begin with, you may need to run the following command to see what monitors are connected where, In my case, the monitor I want to copy (LG 4K 60FPS) is #5
xrandr --query

If this does not help, try the numbers and read the output to see which entry corresponds to the screen you want
sudo ./edid-rw 5 | edid-decode
Now that we have it, we can edit it with one of the software mentioned above, and dump it back on the dongle (The port number does not change, so put your number there and dump the data onto it)
udo ./edid-rw -w 5 < ~/edited_lgedid.bin
Text from the original page of the item
Support hot plug, plug and play
Support virtual display, when the display is powered off or the display cable is hot-plugged, It can achieve no video signal loss, no screen change, no windows running, no order disorder;
Support up to 10.8Gbps video bandwidth; It has power-off memory function, power-off/restart display sequence is not chaotic, and the set mode is not lost.
Supports for AMD multi-screen image card splicing extended split-screen mode, eyefinity wide-area multi-screen splicing mode (pulling the monitor cable when it is powered on has no effect on the display of the screen TV wall, and pulling the line will only cause the screen of the dropped line to be black, and other screens will not move)
Support Nvidia image card multi-screen output, the screen sequence is not chaotic after restart

Connect typ:HDMI
Application scope: Display with HDMI interface
Product name :HDMI lock screen treasure
Max Resolution : 2560 x 1440@60HZ / 3840 x 2160@60HZ
colour:Golden
Material:Aluminum alloy

Package Contents:
6 x HDMI2.0 Virtual Adapter
The aluminum sleeve appears to be fully cosmetic, At least this is my impression as the plastic inside seems very hard, so it is unlikely that the aluminum is providing any support, and obviously is not functioning as any form of heat sink
id3 tags were meant to be a simple way to store metadata in MP3 files, slowly but steadily, things became a bit more complicated
Originally, ID3 tags were meta data near the end of a file, then ID3V2 came along, and meta tags were moved to the beginning (With an ID3V1 copy at the end added by most ID3 editors)
Album artwork is another complication, As it may be embedded in the file, An older method used to depend on keeping an image called “cover.jpg” in the folder where the file is stored.
You can also have “user-defined fields”, which can be helpful if you are developing a music player that has some novel ideas
I run windows in KVM, and the QEMU android Emulator that ships with Android studio crashes all the time, so the obvious solution, with all those android devices I have is to connect a phone to android studio, It is faster and spares me the hassle of finding out why nested virtualization is so terrible
But having a phone connected via USB is not optimal, as i have to pick it up every time i want to run my under development software on it !
The answer seems to be in the
1- install Android WiFi ADB : A plugin easy to install in Android studio
2- A phone with Android 11 and above
So let us do this step by step
Download SDK platform-tools and install it (Copy it somewhere and add that to your system path)
Enable developer options on the phone (Keep tapping build number)
From developer options, Enable wireless debugging
Select Pair device with pairing code. Take note of the pairing code, IP address, and port number displayed on the device (see the above image).
Open the command prompt and run the command adb pair ipaddr:port adb pair 192.168.7.101:45353 Enter pairing code: xxxxxx daemon not running; starting now at tcp:5037 daemon started successfully Successfully paired to 192.168.7.101:45353 [guid=adb-RF8M4xxxxxxx-xxxxxxx]
Now, to have it appear as a device in android studio… Go to wireless debugging and notice the port number, then using that IP and port, use the following command adb connect 192.168.7.101:35127
Recommended: Install the “Android WiFI ADB” plugin in android studio
Solution 3: edit the registry key “Start” in the folder HKEY_LOCAL_MACHINE -> SYSTEM -> CurrentControlSet -> Services – > svsvc | And modify the start entry from 3 to 4 then restart Windows
The official VSCODE extension for rust is called (rust-analyzer) by rust-lang.org
To install rust, All you need is the installer, you can get it from rustup.rs, it might fire up a visual studio installer for the builder if you are running windows…
So, to check that you have rust installed on your computer, You may want to run the following command
rustc --version
In my case, it responds with (rustc 1.77.0 (aedd173a2 2024-03-17))
To update rust, you will need to run the commadn
rustup update
If you want to create a new rust project you CD into a directory where you want the project to be, and issue the command
cargo new projectname
Now, you can open the projectname directory in VSCODE to start working on a project
If at any time you want to update the dependancies in your project, you can simply issue the command
cargo update
from within the project directory, this should update the cargo.lock file etc….
To add libraries to cargo, visit crates.io and you can get the names of the libraries you can add to Cargo.toml
As part of my paranoia when using windows (Fear of ransomware or spyware or otherwise), I allow my web browser to connect via proxy, and the rest of the machine’s apps have no internet access (Which is a KVM virtual machine, with USB and graphics passthrough)
Now, recently, Applications are no longer running on windows 10 ! Instead, I am getting a message that reads :
SmartScreen can't be reached right now.

Check your internet connection. Microsoft defender SmartScreen is unreachable and can't help you decide if this app is okay to run.

Publisher: xxxx
App: xxxx
This seems to be something relevant to Microsoft security, where windows consults with Microsoft before running an app for the first time !
My solution is to disable it, why, because I have to pick one method or the other to protect my computer, and antivirus software, although works if you download torrents etc… doesn’t really detect the latest threats, when they say detects and removes 99% of viruses, this includes all viruses from 1981 onward, and very few of the most recent viruses and threats, so the question remains, if i am not downloading torrents and the like, what are the odds i would meet Michelangelo
So, the steps to disable this are as follows
We use cookies to ensure that we give you the best experience on our website. If you continue to use this site we will assume that you are happy with it.Ok