Sunshine and moonlight

VNC and RDP are great and all, and for so many purposes, they are the goto solution for remoting into a machine.

Now, another solution which is great (And much better if you have the bandwidth) is to broadcast your screen video and do all the work on the server rather than the client

The solution used to be nvidia’s game stream, which was abandoned by nvidia, the new solution based on nvidia would be the sunshine (Server) and moonlight client

The sunshine+moonlight duo work on almost every platform I need, Windows, Mac, Android, iOS, Even LG TVs running web OS… in short, it is a more universal solution. You can even create a virtual non existent monitor under linux and stream that to a different device !

So, let us start with the server (Sunshine)

Installing sunshine on debian is very easy as a .deb installation file is provided, sunshine is not yet in the debian repositories, but if i understand the license correctly, it can be some time in the future

Now, go to the sunshine website, and download the deb file., in my case, I visit this webpage, and download the sunshine-debian-bookworm-amd64.deb file

Now, from the command prompt, su (to run as root), then cd to the directory where your deb file resides, then “sudo apt install ./sunshine-debian-bookworm-amd64.deb”, We should now have the server running and waiting to be opened in the web browser, Now, on the command line , type “sunshine”

Point a web browser to https://localhost:47990/, ignore the problem with self signed certificates, and set your username and password

Now, your debian computer is running a sunshine server, go to any other machine where you want to install the client (moonlight) from here , and connect to your server by its IP address.

You are done !

USB over IP (network)

Hyper-v does not provide USB passthrough, some people use USB redirection from remote desktop RDP… A similar technology might be USB over network, but this does not always work, as many USB devices have very little tolerance for lag ! and this will introduce some lag !

My objective is to connect a MINI-VCI connected on a raspberry PI to a computer running other software to analyze the data, whether this works or not is yet to be seen.

There seems to be a few solutions online, some using generic hardware, and some using specialty hardware

The most diverse of those solutions that can work on everything from a raspberry pi to a windows computer and android phone is (https://www.virtualhere.com/), but I have not yet verified whether this software is USB/IP compatible or not

USB/IP has been built into the linux kernel for some time now, and a couple of solutions for both server and client are available on github, So here I will be investigating what I can do to bridge the Linux Raspberry PI to my windows PC,

USBIP is a protocol where the server is the machine connected to the USB device via wire, and the client is the machine that needs to use the USB device but is not connected to it via USB.

In linux, usbipd is the name of the server, and usbip being the client, In debian, both server and client are included in the usbip package, hence, on the raspberry PI and on the Linux server, we need to run the command

apt-get install usbip

The modules of USB/IP (usbip-core, usb-host, and vhci-hcd) are already included,

We will get to the Windows client after the Linux to Linux section

The two options

In the cases we are exploring here, the server is a Raspberry Pi (3), the client is a Windows machine, but there are a couple of things to try first, the Windows clients are KVM virtual machines, we will try

1- The client is the Linux Host machine hosting the windows virtual machines, and the USB port is passed to the virtual machine

OR

2- The Windows client has the USBIP driver directly connecting to the Raspberry PI server

The Steps

Installing the USB/IP server on the raspberry pi “apt-get install usbip”

How to pick a domain name registrar

Factors to consider

First of all, the choice depends on 3 things, or 4 but to me, the fourth is not very important

  • PRICE for a given TLD (TLD = .com, .net, etc…) and it’s persistence
    This is probably the most important factor, there is no such thing as “Performance” as your registrar does not run the TLD’s registry, something to take into account is also the renewal price next year.
  • whether or not you plan to use their “Usually free” nameservers (Most people will use their web host’s nameservers and not the registrar’s)
  • The business stability of the registrar, when a registrar goes down, you might find your domains with a registrar who picked up all the domains the sunken registrar had, and if you were using the old registrar’s add on services, you will end up needing to redo them, and probably find a different registrar that you like to move those domains to.
  • And last but not least, the interface and speed of the registrar’s website and tools, I don’t think this is very important as most registrars have a usable interface and you will only need to use it infrequently

Which one do i recommend ?

I personally use more than one registrar, for some TLDs, I use nameCheap, and for the more standard domain TLDs (Like .COM etc…) I used godaddy for a long time, then i switched to a godaddy reseller (PoloDomains), it has the same exact products (and phone support) as godaddy and in my experience this reseller has very persistent prices that are lower than those of godaddy themselves, not to mention that godaddy keeps surprising me with different pricing when the time comes to renew. Again, godaddy is a good registrar that checks all the boxes, but the reseller is more or less just cheaper. other good well known registrars include namesilo.com, google domains (Not recommended as google is selling it to another company), Name.com, domain.com and many others that you can research online…

Get it for free when it makes sense

Some web hosts offer free domain names for as long as you are paying for your hosting, this is not exactly a catch, but it might be, so what I do is decide on a web host through reviews and what have you, and if that web host offers free or cheap domains with their web hosting, then that is where I will get my domain, But mind you, when i make the choice, i subtract 1/12 of the normal domain price (that you would get if you used a separate registrar) from the monthly hosting fee, and then compare the web-hosts with the new discounted price tag, the last thing i want is to get stuck with a bad web host because they offer a free domain, that would be a very bad decision.

When is the registrar relevant to performance ?

The main function of a registrar is to sell you domains and register them with a registry, after registering them, the registrar also informs the registry of what nameservers to use with the domain name. after that, the registrar in it’s strict form has no technical function, up until you either want to renew that domain, or change the nameservers attached to that domain, a web request (from a website visitor for example) does not pass through your registrar.

The above remains true, unless you opt to use one of those free DNS services that are provided by many registrars, in this scenario you are using the registrar’s DNS servers instead of your host’s or a third party, which is not a bad idea depending on the quality of your registrar, godaddy (and it’s resellers) provides a free DNS service that uses anycast ! anycast is a cool internet technology where the user will be using the closest DNS server to them without knowing, effectively cutting down the latency of the DNS request.

Changing the default port 80 on nginx

First of all, check what ports nginx is currently listening on, you can do that with any of the following commands

netstat -tlpn| grep nginx
ss -tlpn| grep nginx

So, you probably found nginx listening to port 443 for SSL connections, and on port 80 for plain http….

On many occasions, you may want other application (Such as varnish or apache) to be listening on port 80, So nginx needs to move to another port, in this example, I am moving it to port 8080

Step 1: Go to sites available, there is the default site, and there are any other sites you added to nginX, open those config files that you will find in /etc/nginx/sites-available, search for 80, and replace it wherever it may occure with 8080 or any port of your choice, restrictions are the following, port numbers under 1024 will requier root privilages (So keep it above 1024), and the maximum port number is 65535, Also port 0 can not be used for http (Relevant to UDP though)

Tunneling Firefox traffic through SSH – Putty

I will here assume you already have a remote Linux machine that you can SSH into with putty, the instructions are simple from this point on

Putty Setup

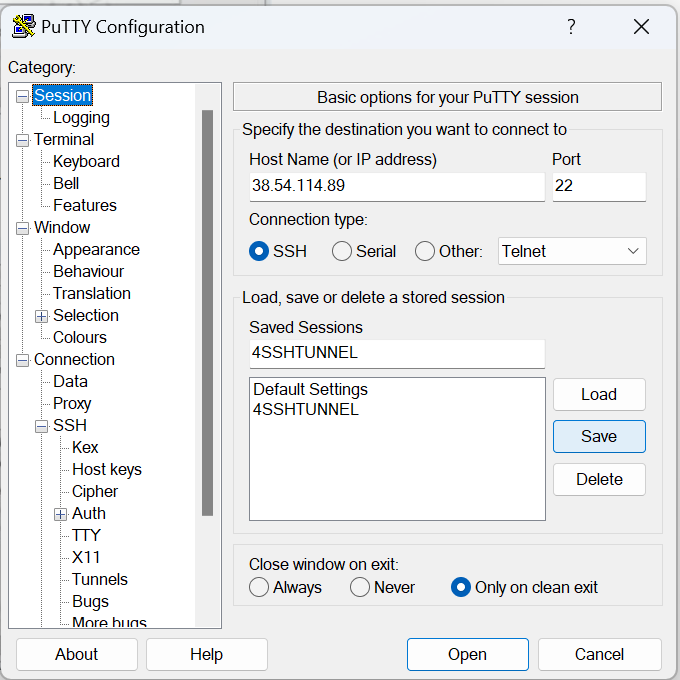
1- Basic putty settings, assuming you have already downloaded putty from chiark.greenend.org.uk, now open putty, enter the IP of the server you wish to tunnel through, and save it with a name, the steps are…
– Open putty,
– enter the IP of your remote machine
– give it a name of your choice
– save (You don’t need to save now, you will save again in a bit, but you can do it anyway)

2- Go to Connection and expand it, then expand SSH, then select Tunnels, this will show a dialogue such as the below, fill in the data as follows

  • A Source port between 1025-65536 (of your choice), i chose 8081 but you can chose any other in that range
  • Check Dynamic and Auto, the click Add

3- From the menu on the left, go back to Session, and click the save button again (So that the new tunnel settings are saved for next time)

4- You are almost done, Now double click the saved session name or select it and hit open, the remote machine should now prompt you to enter a username and a password, once you enter those, you have a tunnel ready on your localhost (127.0.0.1) on port 8081, next we will setup Firefox to use that tunnel

Firefox setup

1- Go to firefox settings (Click the accordion menu to the right, and chose settings), once open, scroll down under general, until you find the Network Settings section, click the settings button in that section

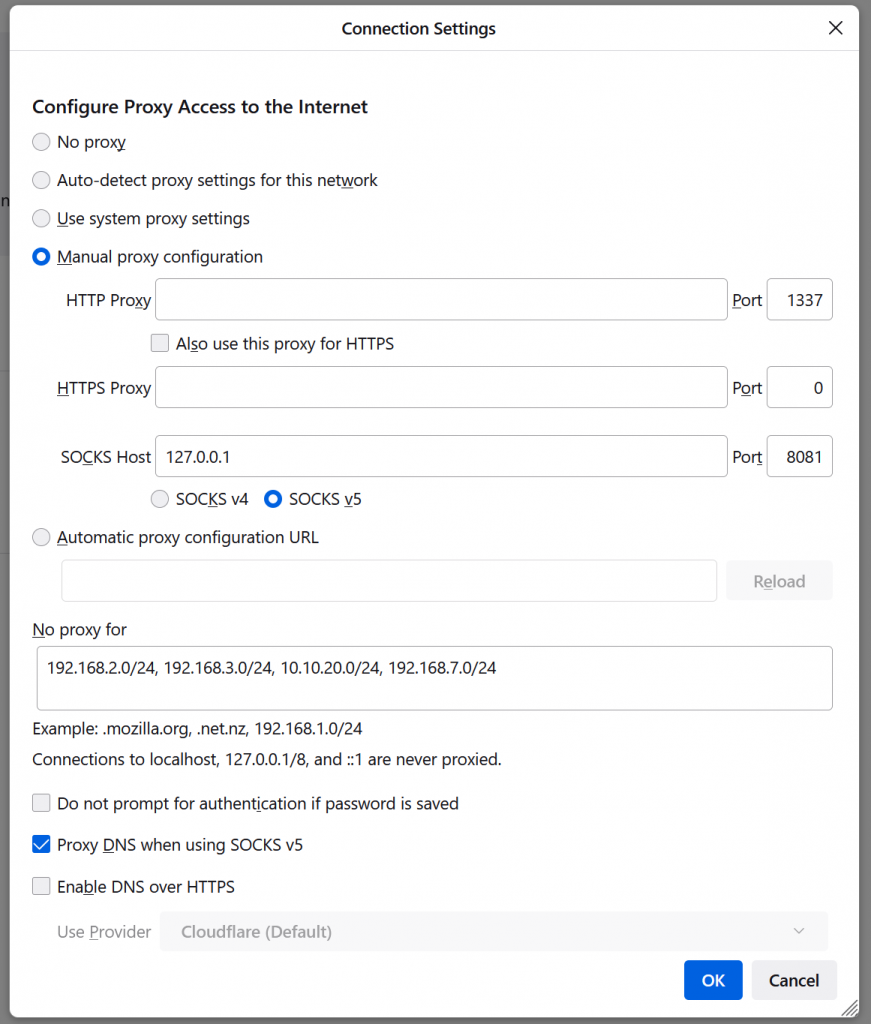
Clicking settings above will show the following popup dialogue, setup your system as follows

  • Manual Proxy Configuration
  • SOCKS Host enter 127.0.0.1 and in the port area of that the port we chose in putty (In my case, 8081)
  • Optional – Add the IP address ranges of the IPs that you do not want to have tunneled through the remote machine
  • For more privacy, and sometimes functionality (When access is blocked from abroad), make sure you tunnel your DNS queries as well (See checkbox below)

Now, to verify that you are conencted to the remote machine, google the following

what is my ip

and google should tell you what your IP address is, at this stage, it should be the same as the remote machine’s IP (Not yours)

Free SSL certificates with Let’s encrypt, step by step

Let’s encrypt is a Certificate Authority (CA) run by Internet Security Research Group (ISRG), and is sponsored by some of the biggest name in the web industry

You are probably here to create a certificate, not get a history lesson ! so Let me cut the chase, for those who want to know more, there is always wikipedia (Let’s encrypt on Wikipedia)

So let’s encrypt provides certificates for domain names, including wildcard certificates (Which I will get to by the end of this article), What we are going through here is the manual process, which serves to give you a taste of how things work, in practice, you are encouraged to use on of the automated methods for multiple reasons, one compelling such reason is that Let’s encrypt issues certificates valid for three months only ! You don’t want to have to cater to your certificate every three months do you ?

To simplify things, I will create a step by step video to demonstrate the creation process ! and post it here, but for now, I will simply take you through the steps, in this tutorial, all you need is SSH access to any server including one you have at home ! or even maybe a virtual machine running Linux inside your windows computer, anything goes, once you have a certificate, you can move it to your production server, this allows me to keep this as general as possible, and this is done using the –manual option, So without further ado, let me get to it

1- login to a linux server and install certbot, the tool that allows you to get certificates from let’s encrypt, On the official website, they promote the use of SNAP, here, I will skip snap and use Debian’s repository ! simpler and there is no need to get into snap

apt install certbot

Now that you have certbot, let us create a certificate for the domain example.com (replace it with your own)

certbot certonly --manual --preferred-challenges http

The –preferred-challenges directive allows you to specify what challenge (http or dns) you would like to perform, the manual plugin is basically the same as webroot plugin but not automated, which is a hassle to keep up to date as this form of issuance needs to be renewed manually every 3 months, (You can take extra steps to automate this) which i will describe later on another post to keep things tidy

Now, as soon as you enter the above, you will enter an interactive dialogue with the following steps

Note: If you want to create a wildcard certificate for your domain name, let’s encrypt allows the use of the * wildcard, but only supports DNS challenge, so the command must reflect that, So when asked for a domain, simply enter *.example.com (or -d ‘*.example.com’), should work normally

As soon as you are in, you will be asked

1- An email for notifications
2- Do you agree to the terms of service ?
3- Would you like to subscribe to the newsletter ?
4- enter your domain names (you should enter both example.com and www.example.com separated by either a comma or a space)
5-

Create a file containing just this data:

Pg1xJ.........-88

And make it available on your web server at this URL:

http://example.com/.well-known/acme-challenge/Pg1...........xuu_0

6- Now you need to create the 2 challenge files, one for exmaple.com and the other for WWW.example.com

Create a file containing just this data:

Ud4m81x..............zupbWEz-88

And make it available on your web server at this URL:

http://www.example.com/.well-known/acme-challenge/Ud4........550

(This must be set up in addition to the previous challenges; do not remove,
replace, or undo the previous challenge tasks yet.)

--------------------------


IMPORTANT NOTES:
 - Congratulations! Your certificate and chain have been saved at:
   /etc/letsencrypt/live/example.com/fullchain.pem
   Your key file has been saved at:
   /etc/letsencrypt/live/example.com/privkey.pem
   Your certificate will expire on 2023-03-11. To obtain a new or
   tweaked version of this certificate in the future, simply run
   certbot again. To non-interactively renew *all* of your
   certificates, run "certbot renew"
 - If you like Certbot, please consider supporting our work by:

   Donating to ISRG / Let's Encrypt:   https://letsencrypt.org/donate
   Donating to EFF:                    https://eff.org/donate-le

At this stage, there are things you should remain aware of

1- DO NOT RENAME OR MOVE THE CERTIFICATES, they need to be in place for renewal if you decide to not automate and check on your certificates every 3 months.

2- Copy (Don’t move) them to the ssl directory, and add them to your config files, the only files you will need to include in your nginx or apache2 config are as follows

For apache 2, you need to use the following 2 lines, modify the path to the files to wherever you have placed them

      SSLCertificateFile /etc/apache2/ssl/example.com/fullchain.pem
      SSLCertificateKeyFile /etc/apache2/ssl/example.com/privkey.key

And for nginx

        ssl_certificate /etc/nginx/ssl/allspots.com/fullchain.pem;
        ssl_certificate_key /etc/nginx/ssl/allspots.com/privkey.pem;

So, restart apache or nginx, and you should be able to see the certificate in action, so this is the simplest way to use let’s encrypt, in my next post, I will

Now, after 3 months, the simplest way to renew the certificate is to issue the command

certbot certonly --force-renew -d example.com www.example.com

Self signed wildcard security certificate for apache or nginx

This tutorial is done on a debian 11 system… it should work for wildcard (For all subdomains under a domain), but also for subdomains or the primary domain, obviously, all you need to do is replace the * which denotes wildcard with the subdomain of your choice, so *.qworqs.com is wildcard, yazeed.qworqs.com is a subdomain 😉 so let us get started

Let’s encrypt has certainly revolutionized the world of SSL certificates (By making them free), but when it comes to wildcard certificates, let’s encrypt will require more than just generating the certificate, it will require a system that automatically alters DNS at your registrar, and differs from registrar to registrar.

So while I am developing, and need a wildcard SSL, I can simply generate a self signed wildcard security certificate, and teach my browser to accept it, and that is that, so here is how to generate that certificate !

So let us get started, first let us create a public and private key in one go, and a folder to store them !

cd /etc/ssl
sudo mkdir qworqs.com
sudo openssl req -x509 -nodes -days 365 -newkey rsa:2048 -keyout /etc/ssl/qworqs.com/wildcard-ss.key -out /etc/ssl/qworqs.com/wildcard-ss.crt

I will personally skip selecting a strong Diffie-Hellman group… this file though goes somewhere else in the nginx directory, and can be generated like the following, but again, I don’t need it atm.

sudo openssl dhparam -out /etc/nginx/dhparam.pem 4096

Now you are done with creating everything you need, the next step is to install them into your nginx configuration

So all you need is to add the following 2 lines into your server section within the website config file 😉

    ssl_certificate /etc/ssl/qworqs.com/wildcard-ss.crt;
    ssl_certificate_key /etc/ssl/qworqs.com/wildcard-ss.key;

Now all you need is to restart nginx, and you should get a warning in your browser, I accept the warning, then make it permanent in firefox from the settings

Settings -> Privacy & Security -> Security -> Certificates -> View Certificates... -> Servers Then switch it from temporary to permanent

And that’s that

New firmware for my Western Digital “My Book Live” NAS storage device

The WD My Book Live is a NAS device based on Debian Linux, Since Debian stopped supporting this processor (APM82181), the device has received no updates and will probably never, so the next best thing to do in my opinion is to install openWRT.

WARNING: I recently got a second MyBook Live device, tried installing 23.05.0 but for some reason, i could not get networking to work, So i simply installed V21, then upgraded to 23… there was probably just something I was missing, but i could not be bothered figuring it out, this was a faster way…

Before you start

1- Only the first few paragraphs of this tutorial (STEPS 1 THROUGH 6) are the instructions you need, the remaining is just for extra reference and in short you don’t need to read it to have your device running, but I do recommend YOU SKIM THE WHOLE THING BEFORE YOU START.
2- This procedure requires you to take the disk out and install it on a PC to switch the firmware, then put it back
3- The upgrade will delete all your data, You will need to move your data that is already on your WD NAS drive somewhere else while the upgrade is ready.

Step 1: Move any existing data BEFORE TAKING APART.

Move any data you may have on the drive to a temporary location outside the NAS drive. this has to be done before taking the drive apart as the unconventional 64 kB block size of the disk will be nothing but trouble if you want to extract the data while mounting the disk to a linux PC for example.

Step 2: Take the disk apart

I have included photos to help you do that, it is not rocket science.

Step 3: Mount the disk on a linux PC (Windows and MAC should work)

and mount it to a linux PC (Windows might work with software such as etcher, but i have no guarantees).

Step 4: Download the openWRT firmware

Go to the drive’s page on the openwrt website (Here), and download it to your Linux (Or windows) PC

Step 5: Write the firmware to the disk.

Decompress the file, then copy it to the drive with a command similar to the command below, but make 100% sure to replace sdx with your own drive designation

 dd if=/root/wdsata.img of=/dev/sdx bs=64k

Write the firmware to the disk, overwriting it, and effectively loosing any data you did not backup in step 1

Step 6: Put the drive back in the enclosure

Nothing to say here, this is the reverse of step 2

Once it is in the enclosure, you can not just connect it to your router as it in itself has this port defined as 192.168.1.1 and is serving dhcp !

Step 8: Create the data partition

At this stage, your device will boot, but you will need to create/expand the data partition, the partition that should not be overwritten when you upgrade the firmware for example.

opkg update
opkg install gdisk blkid openssh-sftp-server block-mount
gdisk -i /dev/sda

As soon as gdisk opens, you may be presented with the following message, if so

Found valid MBR and corrupt GPT. Which do you want to use? (Using the
GPT MAY permit recovery of GPT data.)
 1 - MBR
 2 - GPT
 3 - Create blank GPT

Chose 1 to maintain the 2 partitions we have, Now hit the command (w) to write and confirm, then quit, gdisk has just switched your disk to GPT from MBR, now run gdisk again the same way (gdisk -i /dev/sda)

n for new partition, accept the (3) for partition number, use the number (2097152) for alignment with 4K sector advanced format nearest to the 1GB mark

mkfs.ext4 /dev/sda3
mkdir /share
blkid /dev/sda3

You might find a file named fstab in /etc, this is not the file that needs to be edited, the one you are seeking is in /etc/config/fstab in my case, the UUID was as follows UUID=”9643bd00-f117-4074-a252-7ea30a5174e2″ yours will certainly be different, so in my fstab i added the following lines near the end

config mount
option target '/share'
option uuid '9643bd00-f117-4074-a252-7ea30a5174e2'
option enabled '1'

Now, network sharing is what i was originally interested in when i got this unit, and it is why I am replacing it’s firmware, so to installing samba

opkg update && opkg install samba4-server luci-app-samba4

Now, add the following line to /etc/passwd to add me as a user to the system

yazeed:*:1000:65534:yazeed:/var:/bin/false

Or, if you do not want to add the user manually, you can install the adduser package, and add the users through it like so

opkg install shadow-useradd
useradd yazeed
Unfortunately, this command won't do and you will have to edit it in the passwords file

Now, for either method from the above, run the command

passwd yazeed
smbpasswd -a yazeed

Now, since this is a NAS device, disk tools may be a good idea

opkg install hd-idle luci-app-hd-idle hdparm

To check if disk is spinning, try the command
hdparm -C /dev/sda
The responce active/idle means it is spinning

You are done.

FAQ

Is the hardware and the new openWRT firmware compatible with my 8TB hard drive

Yes it is, I have found many people asking if the hardware supports drives over 2TB, the answer is yes, but you will have to use the GPT rather than the MBR (See steps above)

about the original firmware

What is that vulnerability about

it comes from WDs cloud service, bottom line is that many devices were completely wiped remotely by malicious users and it is unknown if the data itself leaked, so yes, it is very serious

What is the difference between quick factory restore and full factory restore

Quick factory restore is probably what you are looking for, the later seems to do a zero fill on the hard drive after performing a factory restore to disallow data retrieval (For example before you sell it), you can verify this by logging in using SSH, and by the fact that the tool tips state something to that effect.

Inspecting the device

To begin with, I logged in via SSH and inspected some stuff, to enable SSH access on the My Book Live original firmware, you will need to visit a page at a URL such as http://mybooklive/UI/ssh or http://192.168.2.116/UI/ssh (Replace the IP with your own)

the system is based on the following CPU

CPU
processor       : 0
cpu             : APM82181
clock           : 800.000008MHz
revision        : 28.130 (pvr 12c4 1c82)
bogomips        : 1600.00
timebase        : 800000008
platform        : PowerPC 44x Platform
model           : amcc,apollo3g
Memory          : 256 MB

With that out of the way, A look at /etc/apt/sources.list revealed that it is a Debian Distro, the only problem with this is that debian stopped supporting this CPU some time ago, so you can’t go past Debian 8 (Jessie)

deb http://ftp.us.debian.org/debian/ squeeze main
deb http://ftp.us.debian.org/debian/ wheezy main
#deb-src http://ftp.us.debian.org/debian/ wheezy main
#deb http://ftp.us.debian.org/debian/ sid main

Checking the disk info with hdparm revealed that the disk is a WDC WD20EARX-00PASB0, which is as i expected a Caviar Green (SMR disk)

parted (The new fdisk so to speak) shows the following partition scheme for the existing system.

Model: ATA WDC WD20EARX-00P (scsi)
Disk /dev/sda: 2000GB
Sector size (logical/physical): 512B/512B
Partition Table: gpt

Number  Start   End     Size    File system     Name     Flags
 3      15.7MB  528MB   513MB   linux-swap(v1)  primary
 1      528MB   2576MB  2048MB  ext3            primary  raid
 2      2576MB  4624MB  2048MB  ext3            primary  raid
 4      4624MB  2000GB  1996GB  ext4            primary

And a “df -h” reveals

Filesystem            Size  Used Avail Use% Mounted on
/dev/md0              1.9G  555M  1.3G  31% /
tmpfs                 5.0M     0  5.0M   0% /lib/init/rw
udev                   10M  6.7M  3.4M  67% /dev
tmpfs                 5.0M     0  5.0M   0% /dev/shm
tmpfs                 100M  4.6M   96M   5% /tmp
ramlog-tmpfs           20M  4.5M   16M  23% /var/log
/dev/sda4             1.9T  2.1G  1.9T   1% /DataVolume

A good alternative for this Gigabit Lan network attached storage might be openWRT, the same firmware I use for my routers !

there are things you need to know in advance though, first of which is that changing the firmware will require you to delete everything on the drive ! as Western Digital have used an unconventional bunch of things such as a 64 kB block size !

With that out of the way, you can skip down to the installing openWRT about the upgrade process step by step (Including backing up your system), then come back to why etc…

What if i want to revert back to the WD software ?

That is indeed a good question, and to make it easy to do that, I have already backed up the entire disk to another while I am sure that i don’t want to go back. Also worth mentioning that the latest firmware on the WD website dates back to 2015 ! which is at the time of writing 6 years ago !

Where can i find the up to date openWRT distribution for this drive ?

OpenWRT has a page dedicated to this drive, both the single and the Duo here (https://openwrt.org/toh/western_digital/mybooklive)

What are the benefits of the NAS box (enclosure), why not just take out the hard drive and put it in a PC somewhere.

The Western Digital My Book Live has a super low power CPU, and when the disk is spun down, it consumes very little energy (Not a significant load to your UPS for example), It is also fan-less, so it is with the exception of the spinning drive when it is spinning silent, which is also a nice thing, So i would argue that keeping it by updating it’s software is a good idea

Another reason is the amount of relevant software provided through openWRT packages, covering many more things than the original firmware (miniDLNA included).

Errors and resolution

1- I have this error that i have not resolved yet

mv: setting attribute 'user.DOSATTRIB' for 'user.DOSATTRIB': Permission denied

2- The NAS box will not accept many files that windows creates such as Thumbs.db, to allow such files to be stored, This can easily be resolved by editing the samba template and commenting the “veto” files line, then make sure the config is regenerated from the template

How do i keep the system up to date

If you come from a debian background, you would normally apt-get update then apt-get upgrade and that is that, in OpenWRT, there is no such upgrade command, the upgrade command in openWRT is meant to upgrade 1 package specified by name, so the solution is the following line

 opkg list-upgradable | cut -f 1 -d ' ' | xargs -r opkg upgrade

WiFi for Arduino

Even though this looks like a long post, I have composed it for a friend and unlike mostly everything else on this blog, this is not just for my own reference, so it should be easy to follow and understand (I hope).

What for ?

This is a very valid question, Why would i use a slower Arduino and connect it to WiFi using an ESP8266 you ask, why not just use the ESP8266 or even ESP32 as both the WIFI and the microcontroller to run our code?
There are many situations where you would want to, the most common of which is the analogue and digital pins on an Arduino board, the friend I am writing this tutorial for is looking to use the 50 digital pins on an Arduino Mega Pro Embed as select lines for 50 Arduino pro mini boards, another might be the analogue pins on an Arduino (8 or 16 depending on the board), so digital and ADC pins on an Arduino might be needed.

You might ask why not an ESP32, it has a bunch of digital and analogue pins, the answer is that sometimes they are not enough, especially when you find out that the analogue pins on the ESP32 are divided into 2 groups, one of them is not usable if you enable WiFi.

Another valid reason is all the shields that have Arduino libraries but those libraries do not function with ESP, which is probably even more common of a problem than the pins problem.

So in short, even though the need might not arise very often, it does exist.

The ESP8266 as an Arduino WIFI shield

Arduino does not come with WiFi, there are shields from Arduino that provide WiFi, and those shields are based on ESP8266 which is a very cheap WiFi enabled microcontroller. but there is nothing stopping you from using any ESP8266 board and connecting it to your Arduino,

Which one: They should all work, and you probably already have one since you are here, I am personally using the slightly more expensive $4.6 boards that come with a USB-TTL chip and power regulator built in, if you want to use the cheaper boards (esp8266-01), you might want to connect it to the 3.3V output of your Arduino, but you will still need a level shifter, I would expect you also have a UART USB to serial board.

Price: models from the 01 ($2.5 each when you get 5 boards for $12 ) up to the 12E or 12F ($4.6 each when you buy them as 3 for $14). not bad for a WiFi enabled microcontroller !

Communication between Arduino and ESP8266

Arduino can talk to the shield either via UART or via SPI (Given the libraries written for this), SPI is up to three times faster than UART, but most of the time your application, be it sensor data or the like, will not be able to flood any of those 2 buses, In this post, I will cover both, SPI first then serial.

The components (hardware)

1- ESP8266 (Any variant should do)
2- Logic level shifter, since Arduino is 5V and ESPs are 3.3, I have been told that the ESP 12E and 12F are 5 volt logic tolerant, but I would think going with a logic shifter might save me something down the road, hours of debugging, or a new board, or something i fail to foresee
3- An Arduino, I am using a mega, but an UNO should do just fine (I will cover it)
4- Wires to connect all the above, and probably a breadboard (I like to solder things to a universal PCB board, but not everyone likes to do this)
5- A power supply, in my case a couple of micro USB cables and a 5V source that is my a power supply.

Software on the ESP8266

1:SPI: If you are going with SPI, you will need to flash JiriBilek / WiFiSpiESP onto your ESP8266, fortunately, this comes with an ino file that you can use your Arduino software to flash directly

2:UART-Serial: If you are going with serial, you might want to go with jeelabs / esp-link, mind you, Arduino themselves forked this before for their own WiFi shields, but since then, the jeelabs esp-link has added many features, so i would recommend you go with the original jeelabs.

Software on Arduino

1:SPI: if you have installed the SPI software from above on your ESP8266, the accompanying Arduino software would be JiriBilek / WiFiSpi, The library implements almost the same functions as the Arduino WiFi library.

2:UART-Serial: there is no library to go with this case that is beyond your regular serial bus if you want to exchange serial info, so if this is a 3D printer, software on your PC should be able to translate the data into serial, and it would be transparent, but what if you want to use WiFi from within Arduino, like a client that downloads pages or sends post data to pages,

Choice of UART-Serial vs SPI

UART-SERIAL, has certain advantages and disadvantages, with serial, i can simply update the software on the Arduino over the air over WiFi, I can get serial messages and use WiFi at the same time both as client and server, SPI on the other hand is faster, but it is not out of the box compatible with serial messages. Another disadvantage of SPI is that it needs a bit of extra code to allow the board to boot

Implementing WIFI over SPI

SPI – The hardware, how to connect

The H.SPI (On the ESP8266) is connected to the SPI on the Arduino like you would connect any SPI bus, with the addition of a logic level shifter (Red part in the photo), We connect Clock to clock, Slave select to select line, MOSI to MOSI and MISO to MISO, there is nothing to it. I have added a table for the Uno (Same for Arduino Pro Mini) and the Mega for your convenience

 NAME | ESP8266 | MEGA | Uno      | Logic Analyzer |
 SS   | D8      | D53  | D10      | CH0      | SS
 MOSI | D7      | D51  | D11      | CH1      | MOSI
 MISO | D6      | D50  | D12      | CH2      | MISO
 SCK  | D5      | D52  | D13      | CH3      | SCK

Now assuming you are done with the connection above, it is time to load some software.

SPI: Installing the WiFiSpiESP on the ESP8266

First, we need to load the software to ESP8266, the JiriBilek / WiFiSpiESP comes with a .ino file, so all you need to do is load that into Arduino studio, connect your esp8266, compile and upload, now this part is done, no modifications are needed to this code since all the control is passed on to the Arduino, compile and upload.

If you are having trouble uploading the code or selecting the board, my 12E board works in Arduino studio as NODEMCU V1.0, if you don’t have any ESP8266 boards in your boards list, you will need to add it, there are many tutorials on using Arduino with esp8266.

SPI: software on the Arduino

On the Arduino side, you will have to include the library (WiFiESP), then include it in your code, the library should be readily available in your libraries menu of your Arduino Studio.

NOTE: Both the library and the software you installed on your ESP need to have the same release number (0.2.5 at the time of writing) or it would not work, the software is hard coded not to work if they don’t match, you will be presented with the error (Protocol version mismatch. Please upgrade the firmware) in your serial console during runtime, I know this because a couple of weeks ago, I contacted the author (Jiri) through GitHub, and he brought both versions of the software and the library current so that they would match, it was a small thing but if you ever get this error in the future, you know where to go, he was quick to fix it within hours.

Now to the Arduino code, inside the library, there are examples, all you need to do is upload one of those examples, most likely, you would want to start off with the WiFiWebClient, this example that comes with the library needs to be modified in two locations, the first is the credentials to your WiFi, and the other is to change the server you are connecting to from www.example.com to wherever that web server is. this should get you started on most projects.

In my case, I have had to modify a few things in the script to make it work, first of all, a short delay needs to be inserted before we check if the WiFi is connected, the other is to not have it die but rather try again if it is not for a set number of times

WiFi using UART-Serial

UART-SERIAL should be the as easy, I should be back here

The ESP8266 has a TX and RX pin that should be connected in reverse to the ones on the Arduino, RX (Receive) should be connected to send, and send to receive, both boards need to share a common ground (reference voltage), and an Arduino mega should be able to provide 3.3 volts with sufficient current for the ESP8266 if you plan to power the ESP from the MEGA, if you have an ESP8266 with an onboard voltage regulator, you can simply add it to the power supply directly through the VIN pin (rather than the 3.3V pin)

Uploading jeelabs esp-link to the ESP8266

Start by downloading the zip file from GitHub,