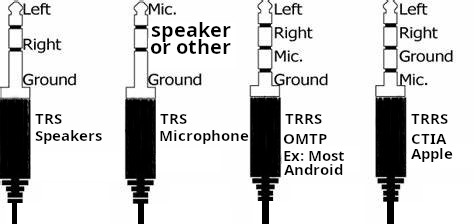
CTIA, which you can think of as apple, and i will call it apple throughout the post to help you focus on what matters, and OMTP, Which is everything else which i will call Android from here on.
For android (And almost any non apple device), the sleeve (Pin closest to the wire) is the ground, and the ring right above it would be the microphone… the other ring and the tip are the two speakers, right and left, In apple’s setup, the ground and microphone are switched together !
TRS
In a 3 pin connector (TRS), When it is meant to carry microphone signal, the tip is the microphone signal, the sleeve is still the ground, and the ring may carry any other signal such as a single speaker channel.
I run windows in KVM, and the QEMU android Emulator that ships with Android studio crashes all the time, so the obvious solution, with all those android devices I have is to connect a phone to android studio, It is faster and spares me the hassle of finding out why nested virtualization is so terrible
But having a phone connected via USB is not optimal, as i have to pick it up every time i want to run my under development software on it !
The answer seems to be in the
1- install Android WiFi ADB : A plugin easy to install in Android studio
2- A phone with Android 11 and above
So let us do this step by step
Download SDK platform-tools and install it (Copy it somewhere and add that to your system path)
Enable developer options on the phone (Keep tapping build number)
From developer options, Enable wireless debugging
Select Pair device with pairing code. Take note of the pairing code, IP address, and port number displayed on the device (see the above image).
Open the command prompt and run the command adb pair ipaddr:port adb pair 192.168.7.101:45353 Enter pairing code: xxxxxx daemon not running; starting now at tcp:5037 daemon started successfully Successfully paired to 192.168.7.101:45353 [guid=adb-RF8M4xxxxxxx-xxxxxxx]
Now, to have it appear as a device in android studio… Go to wireless debugging and notice the port number, then using that IP and port, use the following command adb connect 192.168.7.101:35127
Recommended: Install the “Android WiFI ADB” plugin in android studio
VNC and RDP are great and all, and for so many purposes, they are the goto solution for remoting into a machine.
Now, another solution which is great (And much better if you have the bandwidth) is to broadcast your screen video and do all the work on the server rather than the client
The solution used to be nvidia’s game stream, which was abandoned by nvidia, the new solution based on nvidia would be the sunshine (Server) and moonlight client
The sunshine+moonlight duo work on almost every platform I need, Windows, Mac, Android, iOS, Even LG TVs running web OS… in short, it is a more universal solution. You can even create a virtual non existent monitor under linux and stream that to a different device !
So, let us start with the server (Sunshine)
Installing sunshine on debian is very easy as a .deb installation file is provided, sunshine is not yet in the debian repositories, but if i understand the license correctly, it can be some time in the future
Now, go to the sunshine website, and download the deb file., in my case, I visit this webpage, and download the sunshine-debian-bookworm-amd64.deb file
Now, from the command prompt, su (to run as root), then cd to the directory where your deb file resides, then “sudo apt install ./sunshine-debian-bookworm-amd64.deb”, We should now have the server running and waiting to be opened in the web browser, Now, on the command line , type “sunshine”
Point a web browser to https://localhost:47990/, ignore the problem with self signed certificates, and set your username and password
Now, your debian computer is running a sunshine server, go to any other machine where you want to install the client (moonlight) from here , and connect to your server by its IP address.
To begin with, the links here are Amazon associate links, what this means is that buying things using those links will result in a commission for me ! to recap. “As an Amazon Associate I earn from qualifying purchases.”
What I am trying to do is to create a cover that allows me to switch between USB OTG devices easily at the workshop, so i created a 3D printed connector that fits with the following parts, the STL for that model will be provided once I use it and make sure it works, In addition to the pixel 6 pro, have made the 3D printed connector holder for the Samsung Galaxy S10, S10+, Ulefone Power 5, Ulefone Armor 3,
The external camera also has a 3D printed case design which I will also share… the screen protector has nothing to do with the project, but i am getting it anyways because it is nice if you have screen protection at the workshop, the screen protection uses UV curing adhesive ! which may or may not ruin your oleophobic coating on your screen (remains to be seen)
Things that I am getting
Screen protector Here said to work best with the fingerprint sensor (Once you use the penny trick), and tough enough to stay put with those curved edges !
2 phone covers here (Shaded Spurce (Green) and Slate (Grey))
4 of USB C Magnetic Adapter here, 2 Elbow and 2 Flat Elbow
Things that I don’t want to buy but are worth mentioning
Google’s Air Buds (Pixel) are on sale for $99 (here) and the pro are discounted at $199 (Here), I personally like my ugreen with qualcom chipset, So i don’t think i will get the google ones any time soon, but they are here for ref.
Allowing Adoptable storage on the Samsung J5 20165 – J500H
There are a few tricks for this particular phone 1- We need to replace the recovery system with TWRP
Enable phone developer mode, then USB debugging and OEM override (Disable protection) Download ODEN Download the TWRP .TAR file for your device, for the Samsung J5 2016 (J500H), you should find i here https://twrp.me/samsung/j53gxx.html
reboot your system into bootloader mode (Vol down, Home and power at the same time for 3 seconds to start the phone)
Open ODEN, chose the tar file for AP, and upload the TWRP
Now, don’t let the phone reboot into the system or it will overwrite the bootloader with the original one, instead once the phone starts rebooting, hit, Volume UP and home button and power at the same time, and TWRP will patch the system once it opens in recovery mode so that it won’t overwrite the new TWRP
Reboot system, and boot with Power, Home, And volume down button for bootloader change
From this point on, you can enter into TWRP with the Home, Vol UP and Power button combination at boot time
Now download the patch to enable adoptable storage and store it to the SD card (adoptable_storage_enabler_ashyx) from here https://forum.xda-developers.com/galaxy-tab-a/how-to/patch-adoptable-storage-enabler-t3507387
Start the recovery mode (TWRP mode)
Hit install and chose the file you have downloaded
That’s all you need
Now, next thing you will need to do is to format the SD card using the guide here
To have android treat an SD card like internal storage, you will need to format it as internal storage, a feature of android disabled by most manufacturers, so here is how to do it even when the button is missing.
After you get a RELIABLE big SD card, let us get the procedure out of the way, Read below about reliability and dangers etc.. before you decide on getting a cheaper SD card
This feature of android is called Adoptable Storage.
1-On your windows PC (Or mac): Download adb.exe, there are many places to download it on the internet, but for convenience, here is a 64 bit download of the adb.exe file, in my case, it came with Android Stdio, and i found it in C:\Users\yazeed\AppData\Local\Android\Sdk\platform-tools, obviously you will have your username in place of yazeed in the path above
2-On your phone: Open your phone, Go to Settings, About, Software information, And tap repeatedly on Build Number until it informs you that you are now a developer
3-On your phone: A new developer options Menu should appear, Open it and enable USB debugging
4- Connect the phone to the computer via USB cable
5-On your windows PC (Or mac): Open the command prompt (CMD/Shell), I ran it as administrator to avoid any surprises, and run the following commands, obviously, you will need to change the directory to wherever you put the adb.exe file
cd C:\Users\yazeed\AppData\Local\Android\Sdk\platform-tools
adb shell
sm list-disks
** disk:179,64 <= as you can see, this handle/identifier is our SD card inside the phone
sm partition disk:179,64 private
6- Disconnect the wire.
7- Go to settings => storage => sd card (where yo normally format an SD card), then from the three button menu on the top right, select Migrate data, this will move the existing data from internal to SD card.
So right now, We have formatted the SD card as internal storage, the way this works is that the SD card is overlayed over the existing storage, so whatever you already have on your internal memory is not masked by mounting a new SD card in it’s place, but whatever you save from this point on will be saved to the SD card.
Pros
Cons
* The SD card size is added to the internal phone storage so you can install apps on the SD card and have apps store data on SD card when they don’t offer the option to do that natively
* The internal phone flash memory is not consumed as fast due to flash wear, even though phones usually fail for other reasons before the flash failiure occures, it is mentioned here for completeness
* You can not plug this SD card into your computer, in fact, you are expected to never ever remove it from your phone, this is to avoid catastrophic failiure and data loss
* If your SD card fails or otherwise goes bad, data loss will not only affect the data, but also afects your applications and settings, making the damage much worse
* A slow SD card might affect your phone’s performance.
There are a few things to keep in mind, I ordered them by importance, most important first.
ADB.EXE is a file from google, part of the development tools, and not a third party tool, it’s for android debugging by the people who make android
*RELIABLE: The SD card you chose must be super reliable as failure of the card will result in loss of your data, applications, settings, and your phone’s functionality in general, making it much worse than when using the SD card as external storage, Get an SD card with wear leveling, as the ext2/ext4 file system that android uses is not too good with flash memory, I personally use sandisk, some sandisk models explicitly state that they have wear leveling, get those, and beware, there are many many fake SD cards on the market, so get it from a reliable source.
*FAST: The SD card you chose needs to be fast, the faster the better, even though at some point, the speed of the SD card hits the phone’s limit (the speed the phone can access the SD card), having a very fast SD card will ensure fastest possible operation of your favorite apps
*One partition: I have seen people online split the SD card into some internal storage, and some external, but they provide no justification to the benefits of this, as windows will only read the first partition of the disk, My advice is to use the whole SD card as internal, as ther benefit of having part of it as external storage is debatable at best.In case you are wondering how that is done, in place of the line where it says
sm partition disk:179,64 private
You will need to use
sm partition disk:179,64 mixed 20
The alternative line you see above will create an internal storage partition of 80% and leave 20% as external SD storage
*WHATSAPP: The main reason i did this to my phone is that my whatsapp messenger is bombarded with gigabytes of video all the time, and whatsapp does not natively allow for storing media files such as video to external SD cards, in this solution, there is no compromise as the solution is invisible to whatsapp, whatsapp now stores media to the SD card with no real compromise.
Why is it disabled in most phones: This is a good question, The official reason, which is a valid, legitimate reason, why companies like samsung asus and others disable this feature is reliability, manufacturers can’t guarantee that yo did your homework and got a reliable and fast SD card, they also can not guarantee you will not accidentally switch the phone on after removing the card, or even remove the card while the phone is running, so in short, leaving this feature in is unwise for the average user, a great side effect (To them) from this legitimate reason is that they can sell larger capacity phones at a higher price and a higher profit margin, but that is irrelevant as the first reason is very legitimate.
*Learn: To learn more about the technology, you can visit the Adoptable tech page on the official android website, https://source.android.com/devices/storage/adoptable
* Temporarily taking it out: Most phones these days come with Dual SIM, and in most cases, an SD card slot that takes the place of the second SIM card, the issue here is that if you ever need to use the second SIM card slot for a SIM card, you can not just temporarily pull the SD card out without causing massive damage to your apps and data, god knows how the system and it’s sb systems will react to missing data and applications, probably by recreating them blank again, and when you insert the SD card again, there will be a clash of file names.
Before i tell you that there has been a software update for this phone, let me remind you of my review of the phone
The lowdown: right after the update, i tested the P698 dual sim android, and i can say that the phone which was a disaster before the update is perfectly usable now, i would still prefer the samsung galaxy Y duos (GT-S6102)
I have only used this phone as a 3G modem up to now, when i tried to use it as a phone, it was a disaster, the phone battery does not last for a day, and this is nothing compared to the very faulty software, ending a phone call is very hard to do (you need to wait 10 seconds before you can be sure the other party can no longer hear you) that is, if this magical phone does not get into stupid mode and make ending the phone call mission impossible, in short, the phone is a disaster.
Worth mentioning is that the phone hardware is pretty OK, in some regards better than the Samsung Y duos, it is the software that is a disaster, the only thing that i consider essential and is missing from the hardware is the proximity sensor (the one that disables the touch screen when the phone is close to your face). CORRECTION: THE LG P698 does have a proximity sensor, and with the new update it works just fine.
So, today i decided to check whether the phone got a new software update, and indeed it has (the second), this update is named (and dated) v10g-jul-06-2012, where the update right before this one was v10f-mar-07-2012, so what did LG do in those 3 months, any news of fixing the bugs that were killing me ?
I will now install both my lines into this phone (from my very usable and useful Samsung Y duos), i will try the phone for a couple of days and let everyone know of the results, i am not optimistic
I will be back in a couple of days to tell you all if the phone is better now.
The update:
The new update improves the software so that this phone is now usable compared to a phone i bought and could not use, the samsung galaxy Y duos is still better than this phone (and has the swype application that is very nice), so i am still favoring the Samsung Galaxy Y duos, but the LG P698 is not so bad now, it works as a phone just fine
I like the idea of Dual SIM android phones because one SIM can provide data at a cheaper rate, the other can be my phone line, and i will not experience overages on my main phone like (billed at a premium when over quota).
The LOWDOWN, Get SAMSUNG, if you like get the ALCATEL, stay away from the LG, it is a disaster, 3 LG Phones suffered the same exact problems.
I have tried 3 Android dual SIM phones to date.
Samsung Galaxy Y Duos (S6102)
Excellent up to now, no problems with this phone at all, but we have only used it for 3 days up to now (We are 3 people with three phones)
ALCATEL ONE TOUCH BLAZE DUO OT-890D
A bit slow, dialer good, not very responsive, but works as a mobile phone, don’t expect to flawlessly play angry birds
LG Optimus NET duo – LG-P698
A complete disaster despite the excellent hardware (for the price), All 3 phones (now replaced with the SAMSUNG) have the same exact problems, software for all 3 phones was updated to the latest software, and still a disaster.
The best hardware rendered useless with LG’s very bad dialer, the dialer hangs, sometimes calls people and there is no way to stop the call, takes a good 10 seconds at best to hang up, and if you press hang up more than once, it will call the person back, all in all, the basics are hell in this phone.
The battery is also very very bad, 16 hours at best if you don’t use it at all (Had one 3G sim card and 1 GSM only SIM card), the power manegemnt of the phone is not all that good and that is probably the reason it depletes a battery bigger than the samsung battery in much less time.
The good side of it is that it is very fast when sharing the internet by becoming a potable hotspot (WIFI tethering), it’s browser is good, it’s hardware is good, it has 512MB of ram (That’s plenty), but it is a very bad phone.
We use cookies to ensure that we give you the best experience on our website. If you continue to use this site we will assume that you are happy with it.Ok