Copy KVM virtual machine

This is much simpler than you’d expect (provided there are no hardware passthoughs, and there usually isn’t), All you need to do is copy both the Disk and the XML file (Typically in /etc/libvirt/qemu) then

1- edit the following in the XML file

Create a new virtual machine ID

uuidgen

Create new MAC addresses for every network adapter

https://olavmrk.github.io/html-macgen/

Change the path to the disks to point to where you put the new copy of the disks

Thats it, now you need to tell KVM about it so….

2- Tell KVM about the new definition with the define function

virsh define /etc/libvirt/qemu/newxmlfile.xml

GPU PCIe passthrough on KVM

Before you start

This may look like a long post at first, but in reality, it is but a few commands, the rest is output and small simple explanations, so don’t be discouraged by the length, it is really neither complicated nor lengthy.

Yet, you do need to check the hardware requirements before you get your hands dirty, you will find them in the “Minimum hardware requirements” section of this post

Continue reading “GPU PCIe passthrough on KVM”

Mounting QCOW2 (KVM/QEMU) directly

First, the tools you need

apt-get install qemu-utils

Now, enable NBD

modprobe nbd max_part=8

Once that is enabled, connect the file as a block device

qemu-nbd --connect=/dev/nbd0 /hds/usb/virts/Windows/main.qcow2

Now, the block device should appear like any other, alongside the partitions inside !

fdisk -l

On my machine, this resulted in

Disk /dev/nbd0: 95 GiB, 102005473280 bytes, 199229440 sectors
Units: sectors of 1 * 512 = 512 bytes
Sector size (logical/physical): 512 bytes / 512 bytes
I/O size (minimum/optimal): 512 bytes / 512 bytes
Disklabel type: dos
Disk identifier: 0xc5324c42

Device      Boot     Start       End   Sectors  Size Id Type
/dev/nbd0p1 *         2048    104447    102400   50M  7 HPFS/NTFS/exFAT
/dev/nbd0p2         104448 198138958 198034511 94.4G  7 HPFS/NTFS/exFAT
/dev/nbd0p3      198139904 199225343   1085440  530M 27 Hidden NTFS WinRE

This disk was around 40GB, but fdisk will see the number corresponding to the largest allowed size, 100GB in this case ! let us mount the drive

mount /dev/nbd0p2 /hds/loop

Now, in this case in particular, like any other block device that held the windows operating system, more often than not, you will get the message saying

The disk contains an unclean file system (0, 0).
Metadata kept in Windows cache, refused to mount.
Falling back to read-only mount because the NTFS partition is in an
unsafe state. Please resume and shutdown Windows fully (no hibernation
or fast restarting.)
Could not mount read-write, trying read-only

The solution to that is simple, follow the following two steps to remedy the issue and then force mount the file by using remove_hiberfile

ntfsfix /dev/nbd0p2
mount -t ntfs-3g -o remove_hiberfile /dev/nbd0p2 /hds/loop

The result of NTFSFIX was

Mounting volume... The disk contains an unclean file system (0, 0).
Metadata kept in Windows cache, refused to mount.
FAILED
Attempting to correct errors...
Processing $MFT and $MFTMirr...
Reading $MFT... OK
Reading $MFTMirr... OK
Comparing $MFTMirr to $MFT... OK
Processing of $MFT and $MFTMirr completed successfully.
Setting required flags on partition... OK
Going to empty the journal ($LogFile)... OK
Checking the alternate boot sector... OK
NTFS volume version is 3.1.
NTFS partition /dev/nbd0p2 was processed successfully.

And the following mount command worked as you would expect, silently

Now, if you want to disconnect the NBD image, you need to unmount (Like you normally would) THEN

#Disconnect the image from the NBD device
qemu-nbd --disconnect /dev/nbd0;
#Unload the NBD module
rmmod nbd;

Step by step Unprivileged containers on Debian Bookworm

The full version of this, with an explanation of everything is here, this one is written for copy-paste and speed.

This version is meant to create unprivileged LXC containers owned by root subordinates, which in my opinion provides the best balance of security and flexibility.

  • Install Debian 12 (bookworm) on a computer or virtual machine or what have you.
  • I personally enable root access under SSH, so all the commands you see here are run as root, you may use another user with sudo if you wish, but i execute as root
  • Execute the following to install LXC (I am installing LXC and KVM) but you might want to remove KVM
apt-get update

apt-get install bridge-utils lxc libvirt-clients libvirt-daemon-system debootstrap qemu-kvm bridge-utils virtinst nmap resolvconf iotop net-tools

Most installations will have 2 users, root and another username you chose while installing the operating system,

Unprivileged containers made simple on Debian 12 (Bookworm)

IMPORTANT NOTE: This is the full version, if you just want to come in, copy some commands, and end up making unprivileged containers under root, THERE IS A SEPARATE POST FOR THAT HERE.

0- Intro

Don’t let the length fool you, I am trying to make this the simplest and fastest yet most comprehensive tutorial to having LXC (both privileged and unprivileged) up and running on debian bookworm !

I sent a previous version of this to a friend to spare myself the need to explain to him what to do, and he found the tutorial confusing ! instead of the old arrangement, having colors to denote what lines are for what task, I have decided to SEPARATE THIS INTO PARTS….

  1. Intro – About this post (You are already in it)
  2. LXC info
  3. Shared system setup (Privileged and unprivileged)
  4. Privilaged LXC step by step
  5. Shared setup for unprivileged containers
  6. Unprivileged LXC run by new user, step by step
  7. Unprivileged LXC run by root user, step by step

I hope this clears things up, the color codes will still exist, mostly because I have already done the work !

Why yet another tutorial ?

Most of the tutorials online focus on creating an extra user to use with LXC, that is one way to do it with a few drawbacks, the other way is to create a range of subordinate IDs for the root user, the advantages of this way of doing it are related to “Autostart” and filesystem sharing between host and guest.

As per usual, the primary goal of every post on this blog is my own reference, the internet is full of misleading and inaccurate stuff, and when i come back to a similar situation, I don’t want to do the research all over again.

Continue reading “Unprivileged containers made simple on Debian 12 (Bookworm)”

Nested virtualization in KVM

The reason I am enabling this in my virtual machine is to develop with android studio under windows or Linux in a dedicated development machine (Let us call it an android development virtual machine), you will need to enable nested virtualization for the virtual android phone that comes with Android studio, there are many occasions where you need nested virtualization, so let us see what we need to do.

1- Check if our system allows nested virtualization with the following line

cat /sys/module/kvm_intel/parameters/nested 

If this returns a Y or a 1, then we are good to go to the next step, if not, then execute the following to enable the feature on the host system

echo 'options kvm_intel nested=1' >> /etc/modprobe.d/qemu-system-x86.conf 

Now, with that out of the way, we can move to the next step

2- Enable nested virtualization in the config of the virtual machine, either with virsh edit or edit the file manually and reload it, whatever you are used to doing should work

virsh edit androiddev

Now, specify either host-model OR host-passthrough, host model is more compatible when moving the virtual machine to a new CPU, while host-passthrough will deliver absolutly all CPU features to the guest os, but is very unfriendly to moving the machine to a different KVM host

<cpu mode='host-model'> 

Installing MacOS in a virtual machine (KVM) under linux

This is a simple task, and it is only simple because of foxlet (@FoxletFox on twitter) (And later kholia)

Anyway, let us get to setting it up, to begin with, you don’t need to download MacOS, when using foxlet’s macOS-Simple-KVM OSX-KVM, https://github.com/kholia/OSX-KVM this system downloads MacOS on it’s own… or you can download it and install it offline (https://mrmacintosh.com/)

WARNING: Starting with Mojave, you need AVX2 support on your CPU, so your 4th gen I7 won’t do the trick

==== offline install start ========

FOR OFFLINE INSTALLATION: this section is for offline installation, unless you want to do offline installation

Offline_1- Go to https://mrmacintosh.com/ and download the version of MacOS you want, you should end up with a PKG file

Download (or use git) to get the OSX-KVM package

Offline_2- Create an ISO file from the PKG file with the following command

mkisofs -allow-limited-size -l -J -r -iso-level 3 -V InstallAssistant -o InstallAssistant.iso path/to/InstallAssistant.pkg scripts/run_offline.sh
==== offline install end ========

Step 1: Make sure you have KVM ! and the relevant tools

apt-get install qemu-kvm libvirt-daemon qemu-system qemu-utils python3 python3-pip bridge-utils virtinst libvirt-daemon-system virt-manager

You know, the usual kvm setup ;), I am hoping you already have KVM, if not, see this post and install KVM first

Now that you have kvm, you need to insure that vhost_net is installed, loaded and enabled

modprobe vhost_net
lsmod | grep vhost

You will also need git to download macOS-Simple-KVM (Has not been updated in 5 years.)

git clone https://github.com/foxlet/macOS-Simple-KVM.git

You will also need git to download

https://github.com/kholia/OSX-KVM?tab=readme-ov-file

Now, download MacOS base image that will download the rest of the operating system (catalina is the latest ?) options in that script are –high-sierra, –mojave, or –catalina.

./jumpstart.sh --catalina

Connecting to Windows KVM with VNC and putty tunnel

The setup assumed in this post is as follows, you are working on a remote windows computer, there is a Linux KVM host computer running guest virtual machines somewhere (OS of guest irrelevant), and you would like to connect to a guest machine’s console (which may be running windows, linux, macOS, or any operating system)

KVM, by default only allows people to connect through VNC to the console of a virtual machine if they are using the local host computer, so here are the tips on creating a tunnel to the host computer and connecting to your KVM virtual machine.

Windows does not support VNC very well, (Most VNC servers don’t run well on windows), but the VNC server here is not windows, it is KVM that is providing the VNC server to the guest’s console.

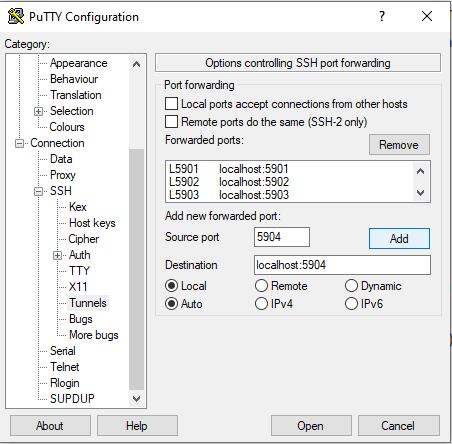
1- Create a tunnel (Putty on windows), simply put, save the connection in putty to that host machine, then under tunnels you will need to have something like this (And go back and hot save again)

Just create a tunnel for port 5900 and the destination localhost:5900 (5901 for the second virtual machine and so on), leave all other tunnel options unchecked/default

2- to know which ones are enabled on your machine run this command

netstat -tlpn | grep 590

3- VNC should now connect to localhost:9500 for example (I am using tightVNC on windows), and that connection should be automatically router to the KVM host, which will display the guest’s console depending on the port (every guest has it’s own port)

Mounting a multipart vmdk disk on Linux

There are many ways to do that, one of which is using the tools provided by vmware to combine the disks into one and then mounting it with

kpartx -av mydisk.vmdk;

Then

mount -o /dev/mapper/loop0p1 /hds/disk

While another method, which is simpler

apt-get install qemu-utils
qemu-img convert disk-s001.vmdk s01.raw
....
qemu-img convert disk-s013.vmdk s13.raw
....
qemu-img convert disk-s032.vmdk s32.raw

The above will be sparse files, so you will not have disk usage as big as the file, a “df -h” should not result in any lost of disk space beyond the data that is used by files in the image

following the above, we need to combine the RAW files like so

cat s01.raw s02.raw s03.raw s04.raw s05.raw s06.raw s07.raw s08.raw s09.raw s10.raw s11.raw s12.raw s13.raw s14.raw s15.raw s16.raw s17.raw s18.raw s19.raw s20.raw s21.raw s22.raw s23.raw s24.raw s25.raw s26.raw s27.raw s28.raw s29.raw s30.raw s31.raw s32.raw > combined.raw
losetup /dev/loop0 combined.raw
kpartx -a /dev/loop0
mount /dev/mapper/loop0p1 /hds/img1

gigabit Ethernet VirtIO driver for Windows 10 64bit

By default, KVM gives your virtual machine a realtek rtl8139 Ethernet adapter, with an ancient 100Mbit/Second speed, we all need gigabit Ethernet adapter for the KVM guest.

The answer is changing the string rtl8139 with virtio in the XML file of the virtual machine, then installing the drivers

The steps i use are

Run virtual machine with the realtek adapter to download the other adapter’s driver
once the adapter is there, shutdown the virtual machine guest (Windows guest), then edit the xml of the guest, and restart libvirtd
start the KVM guest again
open with VNC, start the device manager, install the driver you downloaded.

You are good, the adapter should report the speed of 10Gbit/second (10 gigabit per second)

One annoying thing is that all windows drivers come in a big ISO file, you probably just want the driver you need.

I will add the download links in the coming few days, but you can get them right now if you like from fedora, the fedora windows guest drivers should work on any linux distribution (Debian, ubuntu, etc…)